Requirements
With Reqtest’s requirements module, you can manage the entire lifecycle of a requirement:
-
Gather needs and ensure they are aligned with your goals
-
Collaborate with colleagues to write and review requirements
-
Manage and prioritize your backlog
-
Track the requirement through the implementation phase
-
Ensure the requirement is tested before release
-
Create reports and monitor deliveries
Videos on the Requirement Module
Key Requirement Features
The Reqtest requirements module is primarily built around a requirement hierarchy, the requirement list, and the detailed view for requirements. With the hierarchy, you structure your requirements according to your own logic. The requirement list allows you to view all requirements side by side, and by using filters and adjusting columns, you can display exactly the information you need. In the detailed requirement view, you can dive deeper into a requirement, work on its content, and see all its links and properties.
Why You Should Work with Requirements
Having the right requirements is crucial for a successful system implementation. It ensures that the system addresses the intended needs and defines a scope that you and your suppliers can rely on.
Beyond the obvious benefits, using the requirements module in Reqtest also offers several practical advantages:
-
You, your organization, and the supplier can collaborate and manage requirements in one place, rather than working with scattered Excel files or having requirements stored only by the supplier.
-
Well-defined requirements allow you to plan and track project progress.
-
With your requirements in place, you can more easily ensure quality before release. By linking your tests to requirements, you guarantee test coverage and gain traceability when bugs occur.
-
Quality assurance is impossible without requirements. How can you know what to test if you do not know how it is supposed to work?
Getting Started with Requirements
Before you start using the requirements module, you need to configure it. This is done in Customize Form. However, before configuring Reqtest, the most important step is to plan how you want to work with requirements.
Requirement Hierarchy
The requirement hierarchy in Reqtest is built as a tree structure where you can create up to 10 levels. It consists of hierarchy objects, which represent the different levels, and at the lowest level, you have the actual requirements. For example, you might set up two hierarchy levels, such as Epics and Features, and then use your requirements as User Stories. You can customize which levels you want to use under Customize Form.
Key Features in the Requirement Hierarchy
Create Objects in the Requirement Hierarchy
Here you create hierarchy objects within your hierarchy. Select where in the tree structure you want to add the object, and it will be placed under that level.
Create Requirements
Select where in the tree structure you want to create a new requirement.
Expand All / Collapse All
Click the buttons to easily expand or collapse the tree structure vertically.
Expand / Collapse
Click the buttons to better utilize the screen space, either to view only the tree hierarchy or to hide it.
Drag and Drop
You can move objects within the hierarchy using drag and drop. Note that you cannot move higher-level objects under a lower-level one.
Kebab Menu
Each hierarchy object has a kebab menu. Click it to access quick actions.
Details of a Hierarchy Object
When you click on a hierarchy object, you can see its details. You have several options for how you want to view and work with the object’s information.
Overview and Display Fields
In the detailed view, you can see all fields associated with the object, as well as comments and attachments. You can customize which fields the object has under Customize Form. An important feature is that you can choose which fields you want to display by using the dropdown menu on the right, just like when managing views in the list view.

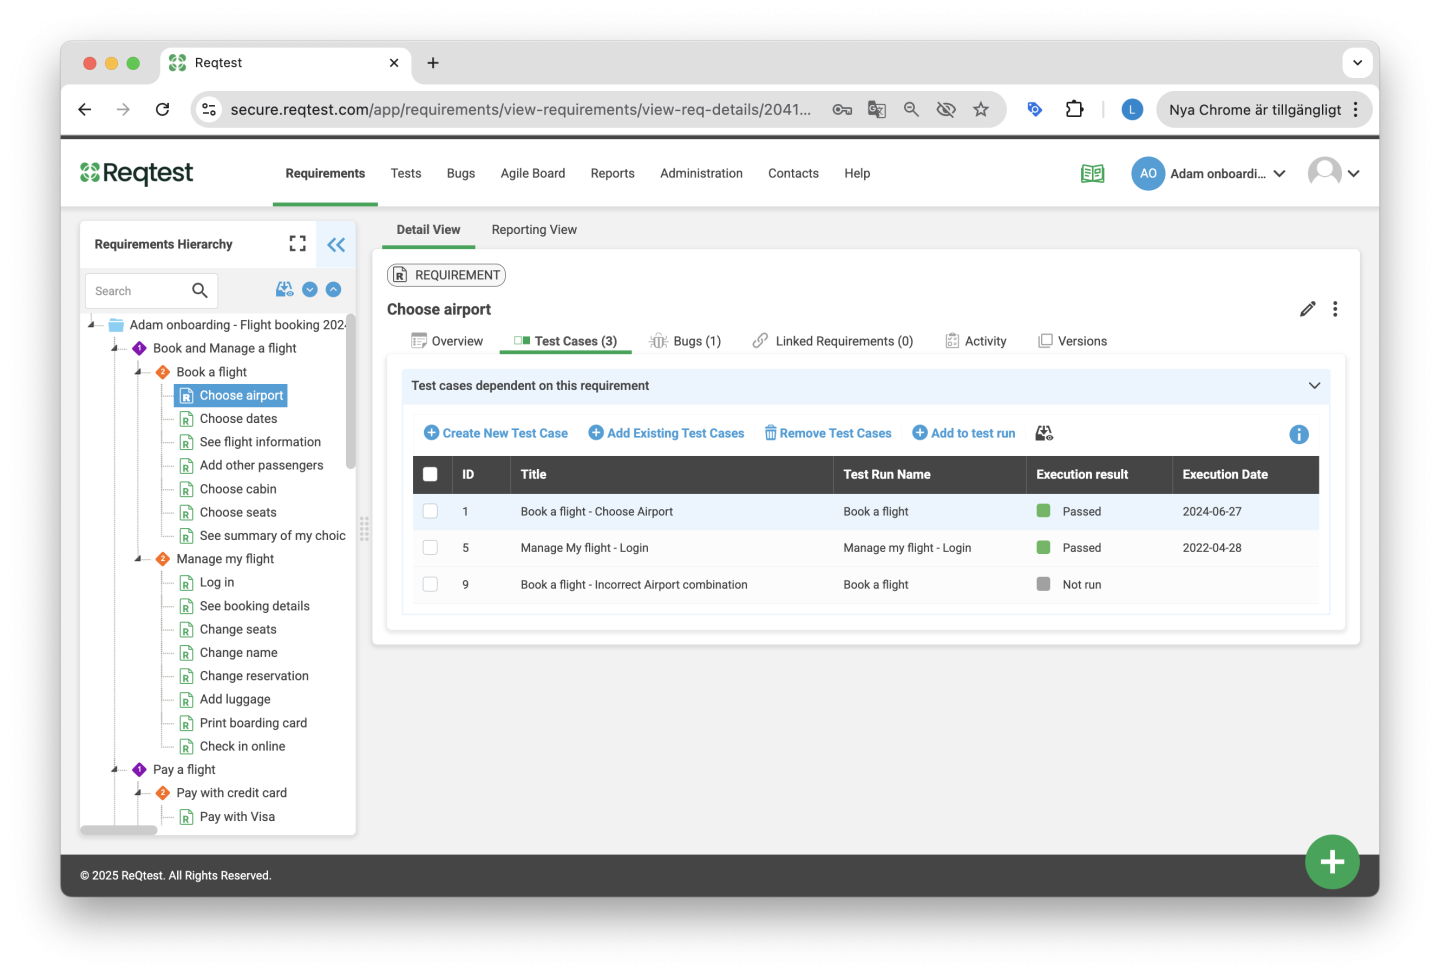
Test Cases
Under the Test Cases tab, you can see all the requirements under the selected hierarchy object, the test cases linked to each requirement, and the latest test run result for each test case.
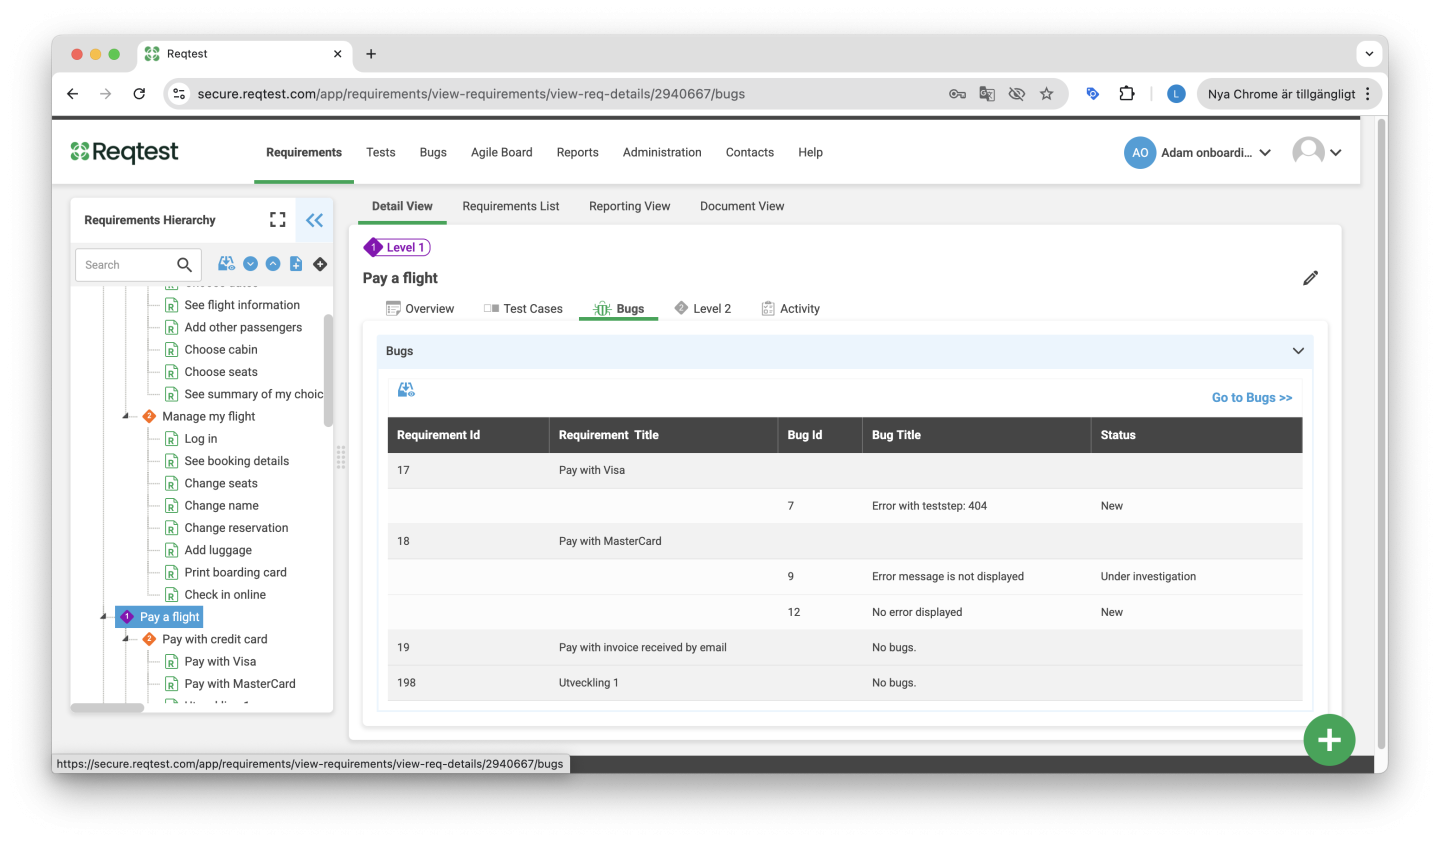
Bug Reports
Under Bug Reports, you can see all the requirements under the selected hierarchy object, along with any bug reports that have been reported and linked to those requirements.
Underlying Level Objects
Here you can see all the level objects that are located under the hierarchy object you have selected.
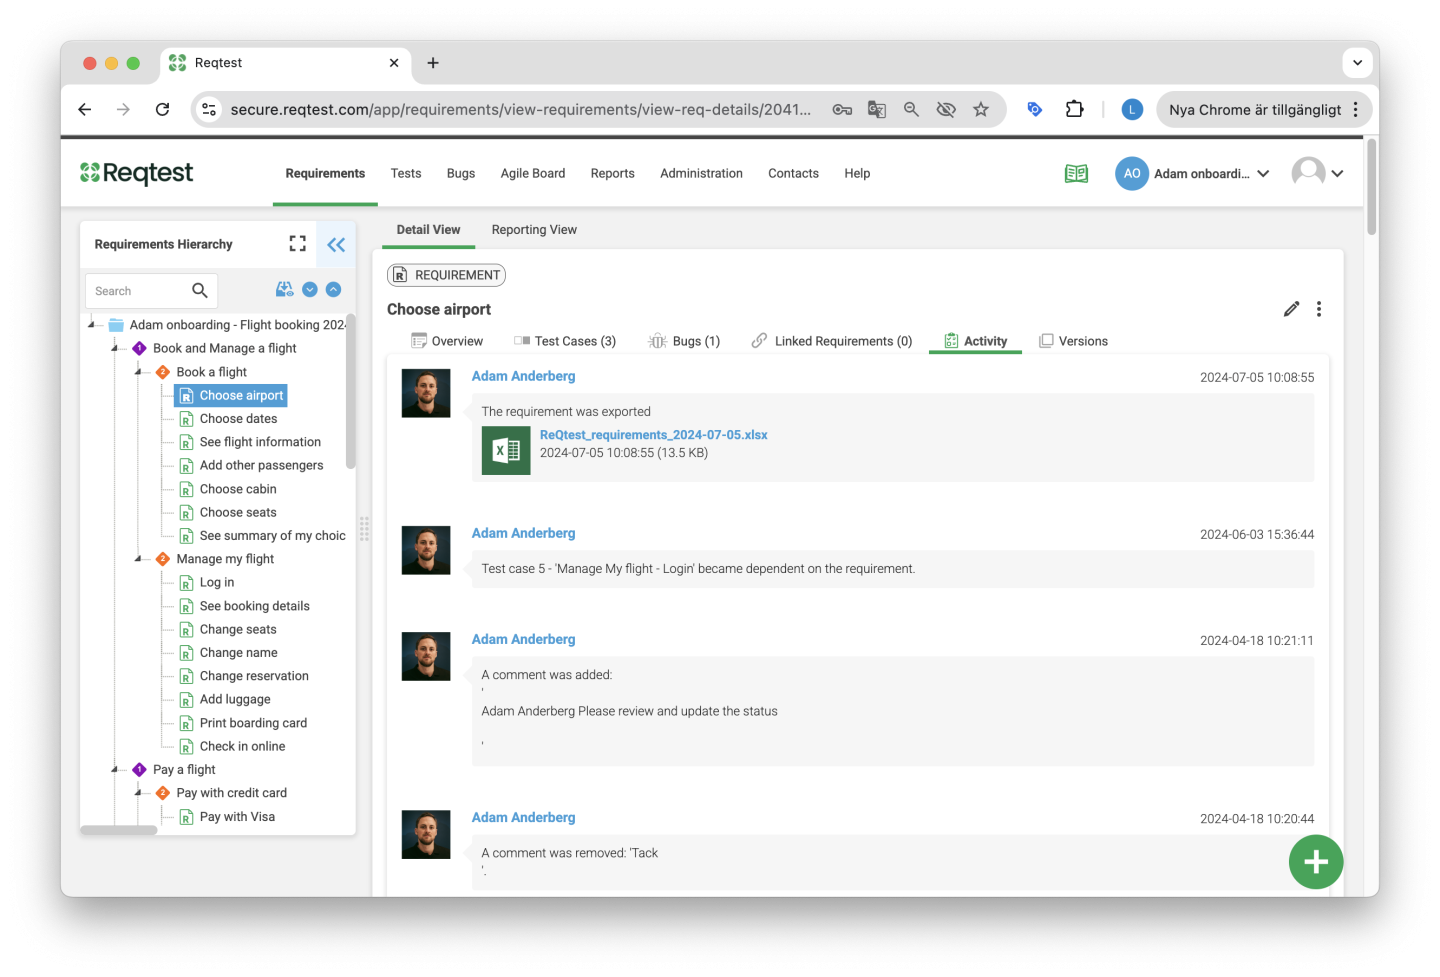
Activity
All items in Reqtest have an activity log, allowing you to see what has been changed, by whom, and when, either for the hierarchy object or its underlying requirements.
Requirement List
If you click on Requirement List, you will see a list of all the requirements that exist in the hierarchy under the selected object.
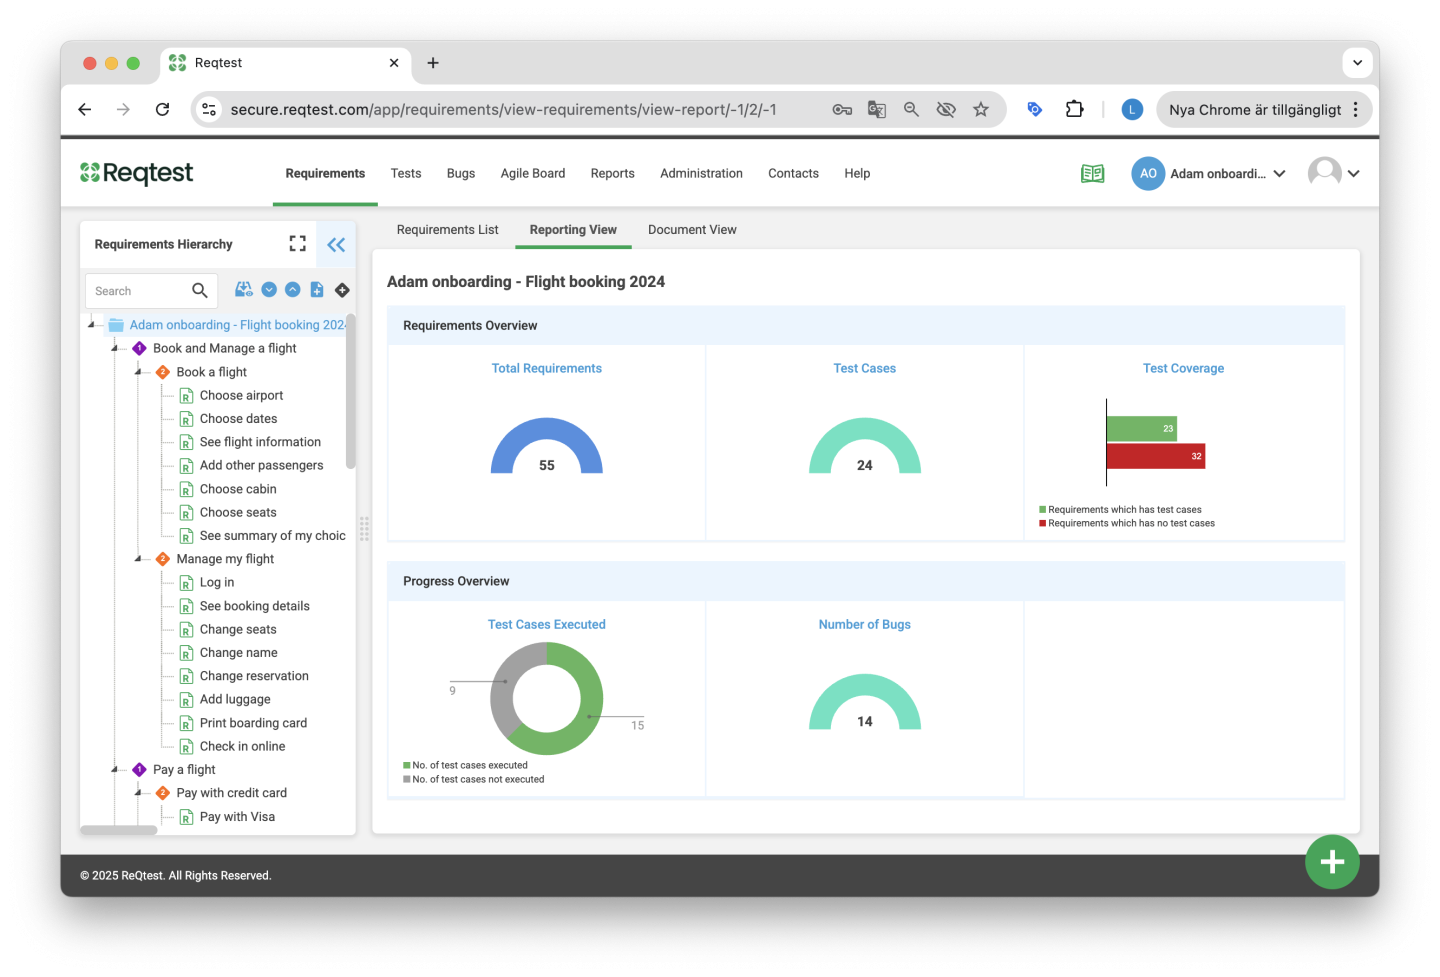
Reporting View
The Reporting View is designed to give you an overview of what is under the selected object. For example, you can see information such as the number of underlying requirements or the level of test coverage.
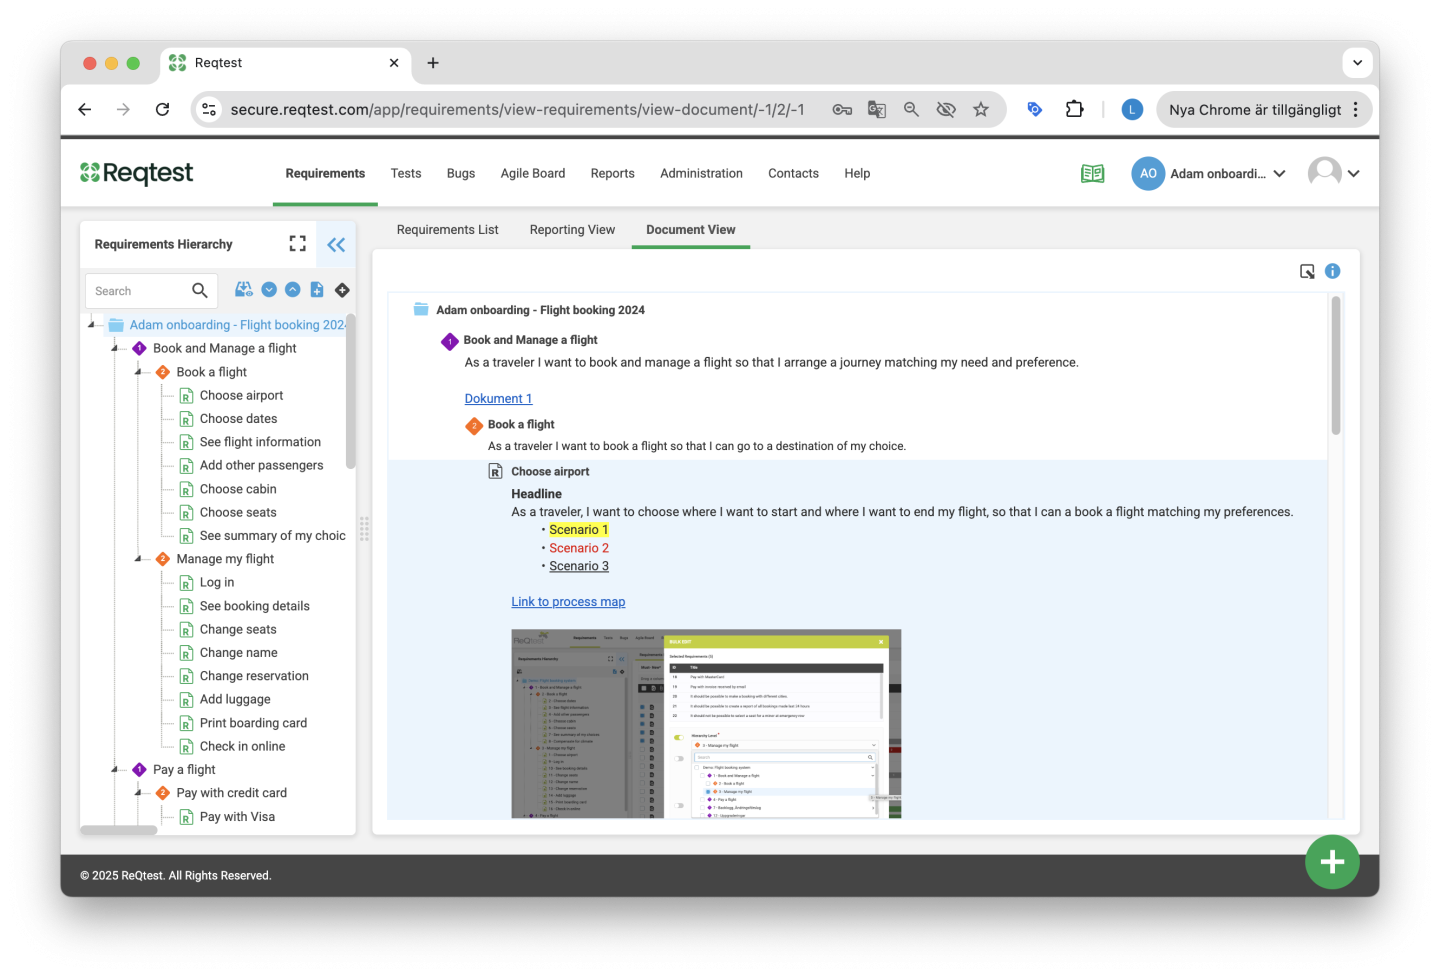
Document View
The Document View is designed to provide a simpler, more Word-like overview of your requirements. By right-clicking on hierarchy objects or requirements, you can add or modify requirements and hierarchy objects. You can also export the view to a PDF to easily share it with others.
Tips and Tricks for the Requirement Hierarchy
1. Before you create your requirement hierarchy, think about how you want to structure your requirements. Do you want to create a hierarchy that breaks down your requirements? Or do you want to use the hierarchy to structure them according to releases? Both options are possible.
2. It is important to remember that you cannot link a test case or bug report directly to a hierarchy object. You must always have at least one requirement in your hierarchy to create traceability to other modules.
3. You cannot convert one level into another, nor can you convert a level into a requirement or vice versa. Therefore, it is important to decide how you want your hierarchy to be structured before you start breaking down your requirements.
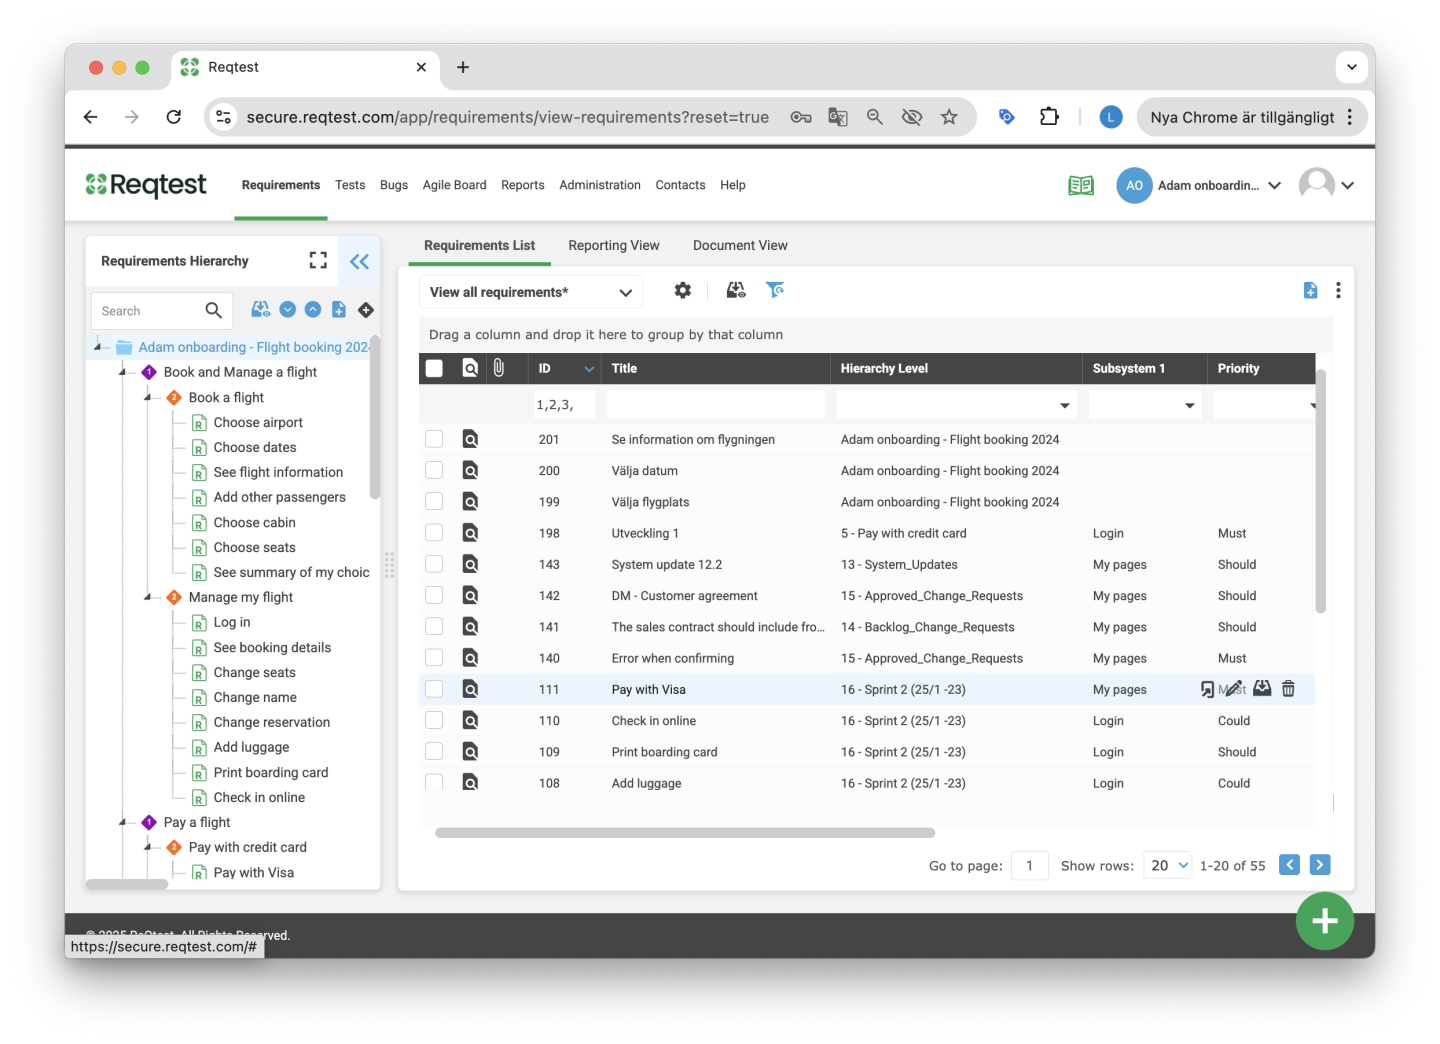
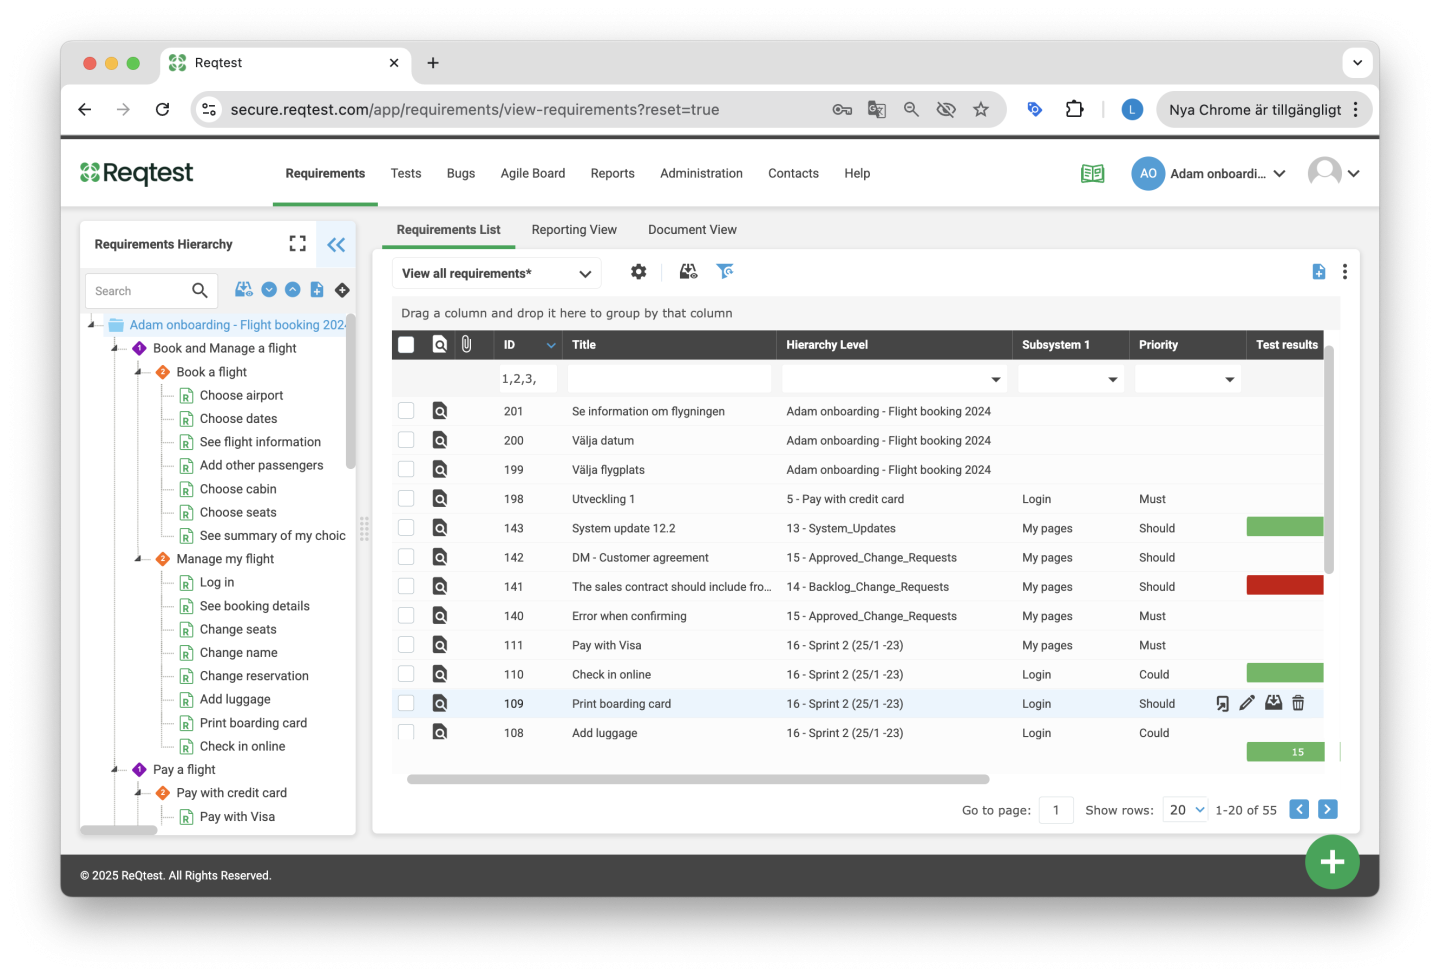
Requirement List
The Requirement List is built like an Excel file, where you can view all information about all your requirements. However, it also offers all the advantages of a centralized tool, such as having all requirements stored in one place instead of scattered across multiple files. You also benefit from a clear activity log and version management. Additionally, requirements can be linked to tests, bug reports, or other systems if needed. To help you focus on the specific requirements and information you want to see, you can use filters and views.
- Filter out exactly the requirements you want to see, and select the information (columns) you want to display.
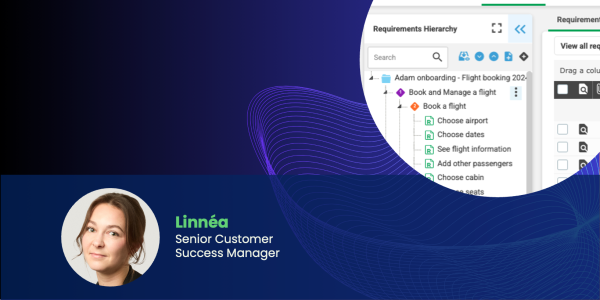
- Be sure to save your settings as different views so you can easily switch between how you want to display your requirements. You can also share your views with other project members. Read more about views here.
Key Features in the Requirement List
Filters and Views
Helps you select which information you want to see about the requirements. Read more about views here.
Archiving
You can archive your requirements, and in the list you can choose whether or not to display archived requirements. Read more about archiving here.
Report View
The Report View is designed to give you an overview of what is under the selected object. For example, you can see information such as the number of underlying requirements or test coverage. If you want to see all requirements, make sure you have selected the root in the requirement hierarchy.
Document View
The Document View is designed to provide a simpler, more Word-like overview of your requirements. By right-clicking on hierarchy objects or requirements, you can add or modify requirements and hierarchy objects.
Functions in the Kebab Menu
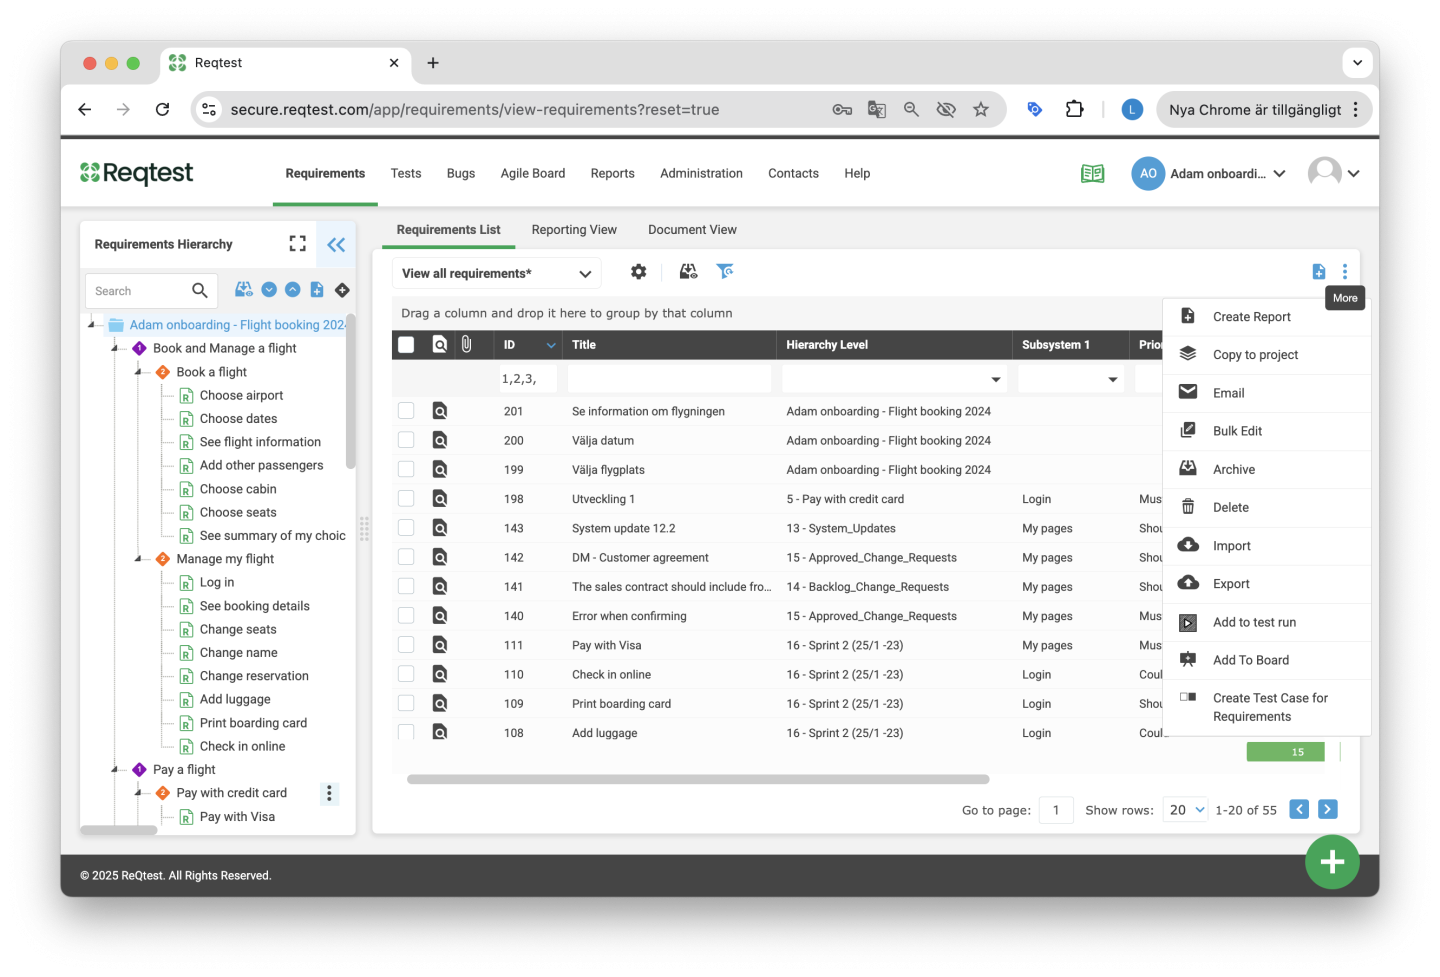
Create Report – Create a report based on the view you currently have active.
Copy to Project – Copy requirements to the same project or to another project.
Send Email – Send an email to inform others about the requirement.
Edit Multiple – Edit information in multiple requirements at once.
Archive – Archive one or more requirements.
Delete – Delete one or more requirements.
Import – Import requirements into your project. Read more about how import works here.
Export – Export the data to Excel. Choose which requirements, fields, and format you want to export.
Add to Test Runs – If you have linked your requirement to test cases for traceability, you can easily add them to a test run here. You can choose to add the test cases to a new test run or to an existing one. Read more about test runs here.
Add to Board – Add the requirement to the Agile Board, either as a sticky or as a lane.
Create Test Case for Requirement – Create a test case that is automatically linked to your requirement.
Tips and Tricks for the Requirement List
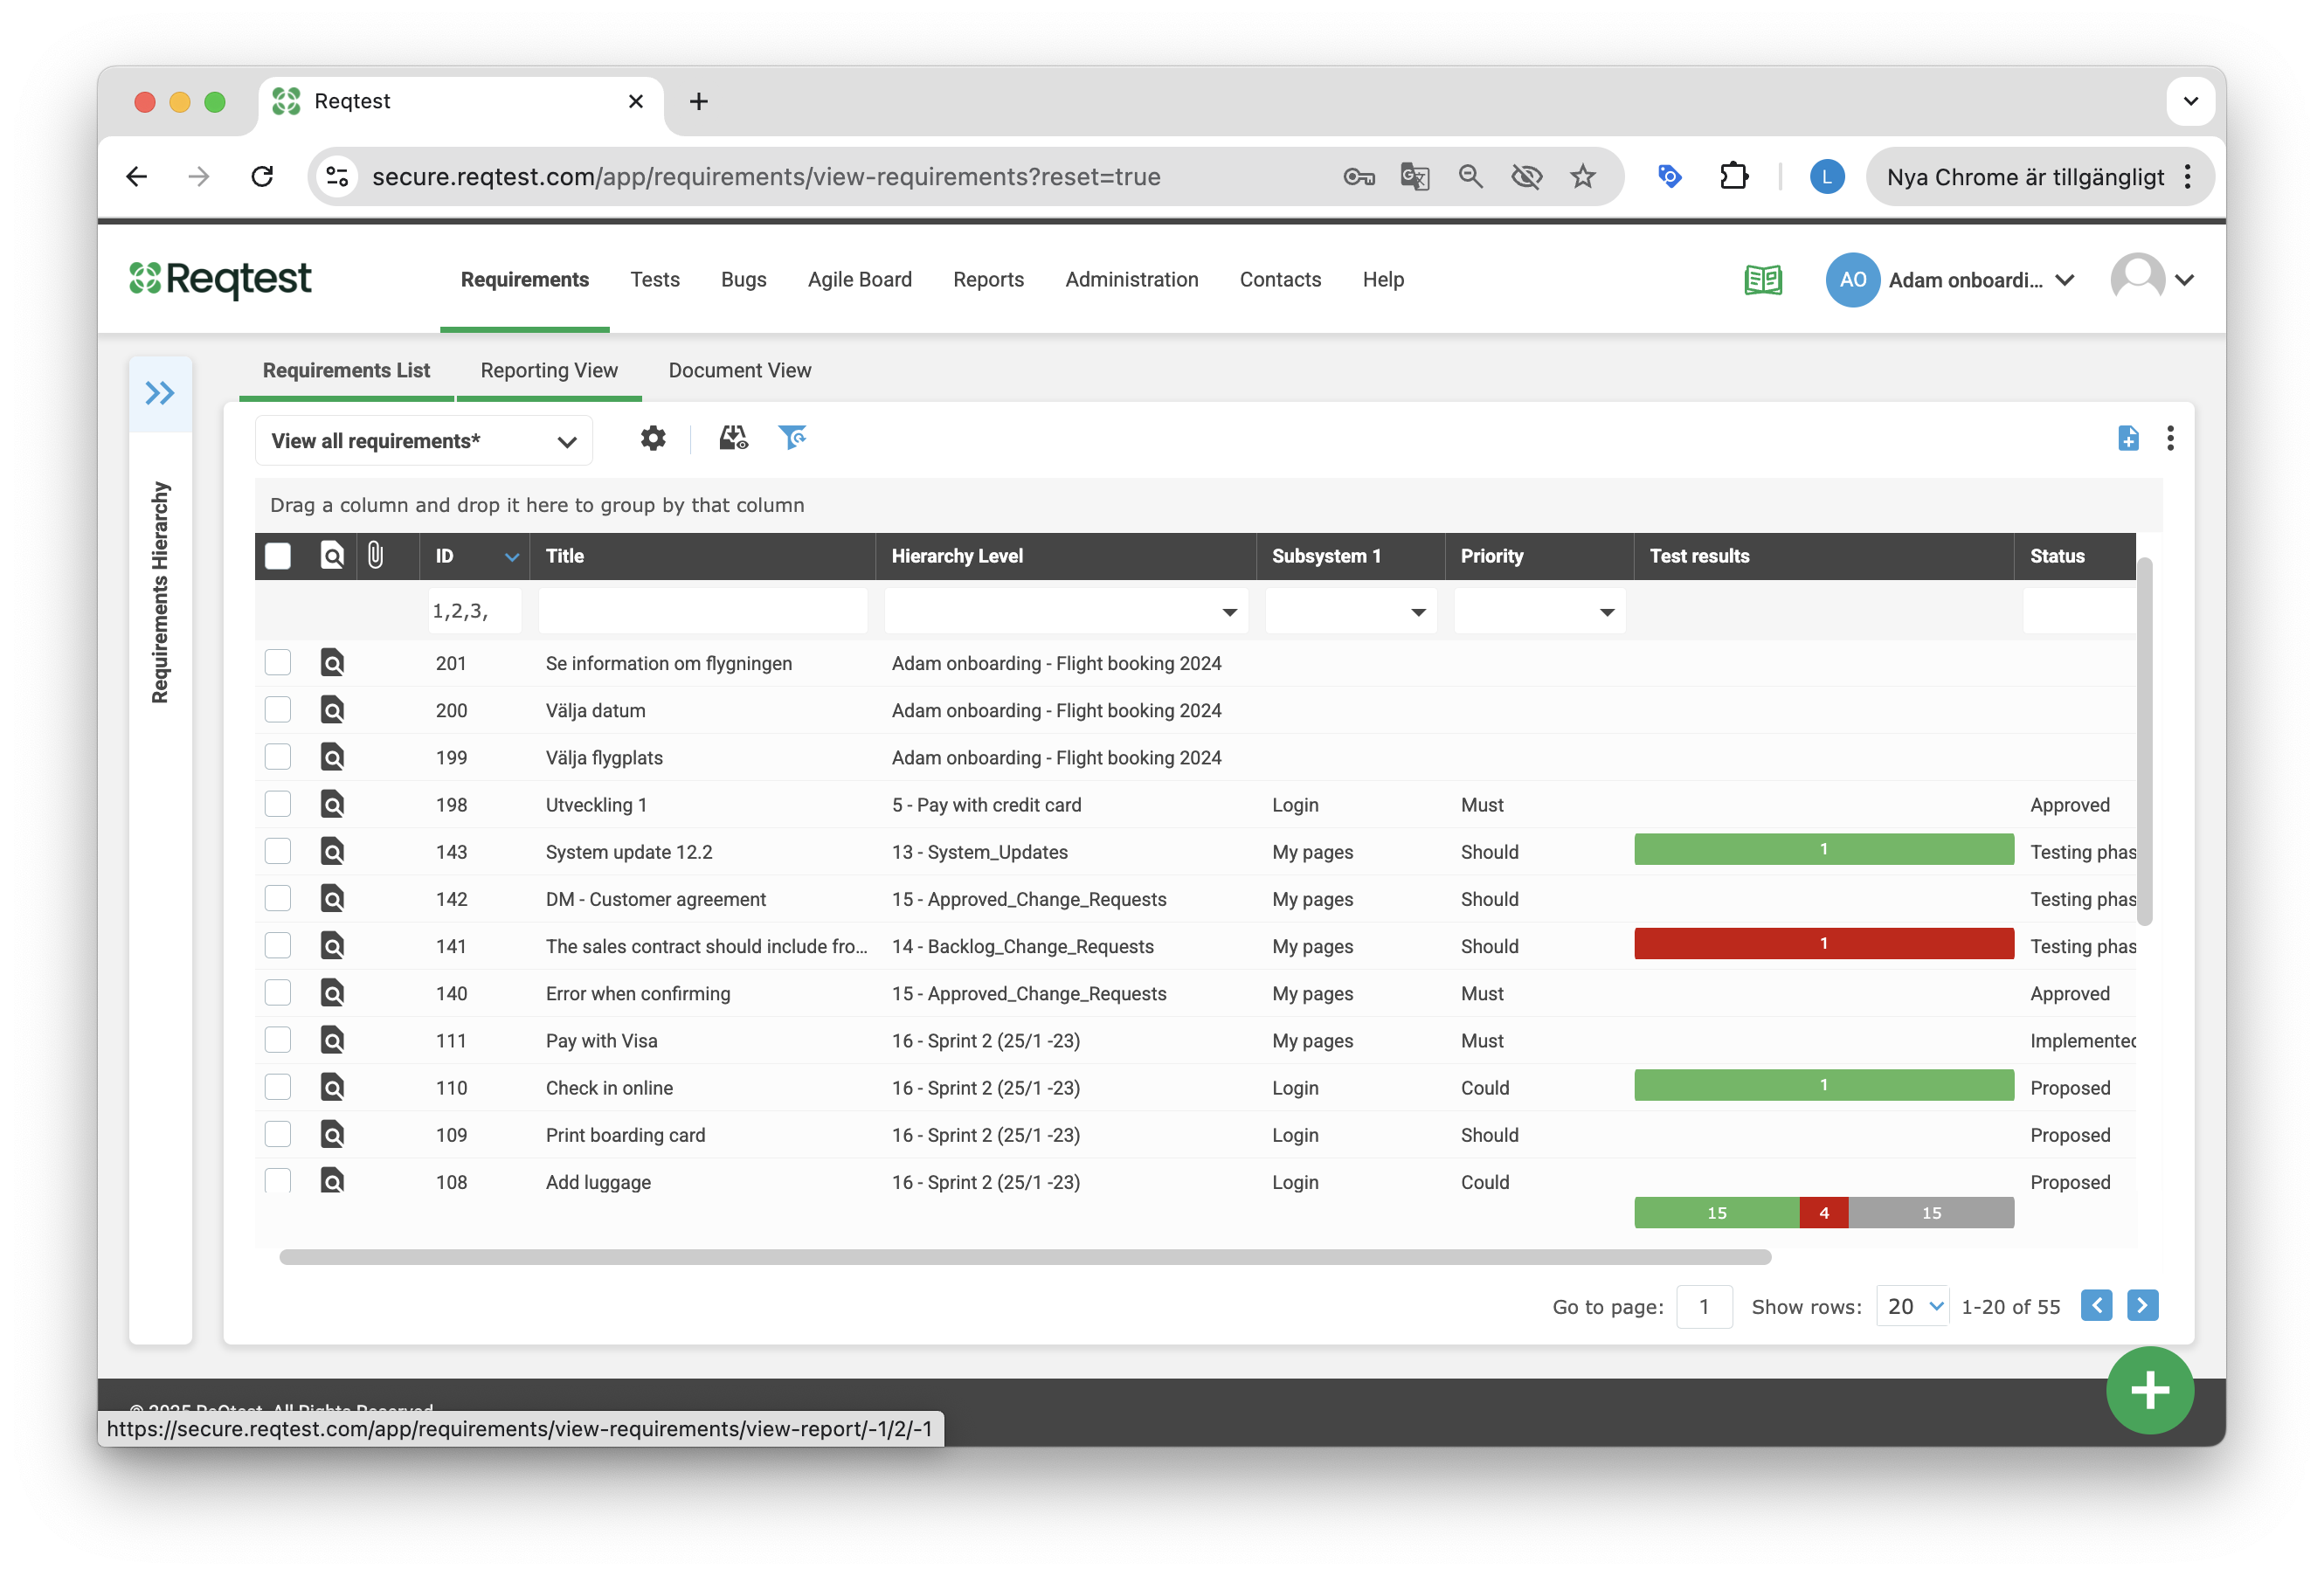
- Custom views are central to how you work with the requirement list. You can create your own views, share your views, and quickly switch between different views. Read more about custom views here. Below is an example of a view where we have filtered requirements belonging to the system area “My Pages.” We have selected fields that give a clear overview of test coverage and the current test run results. A general advantage of Reqtest, which becomes clear when using list views, is that everything is in the same system, making it easy to get both an overview and full traceability.
- Another way to work more easily with requirements in the list is by using quick actions. When you hover over a requirement, you will get shortcuts that allow you to open the requirement in a new window, edit it, archive it, or delete it.
Detailed View – Requirement
In the detailed view, you can see all information related to the specific requirement. You can customize which information you want to display about the requirement. From a traceability perspective, you can view linked test cases, bug reports, or other requirements. You can also view and compare different versions of the requirement. Additionally, you can customize which fields should be used for requirements under Customize Form.
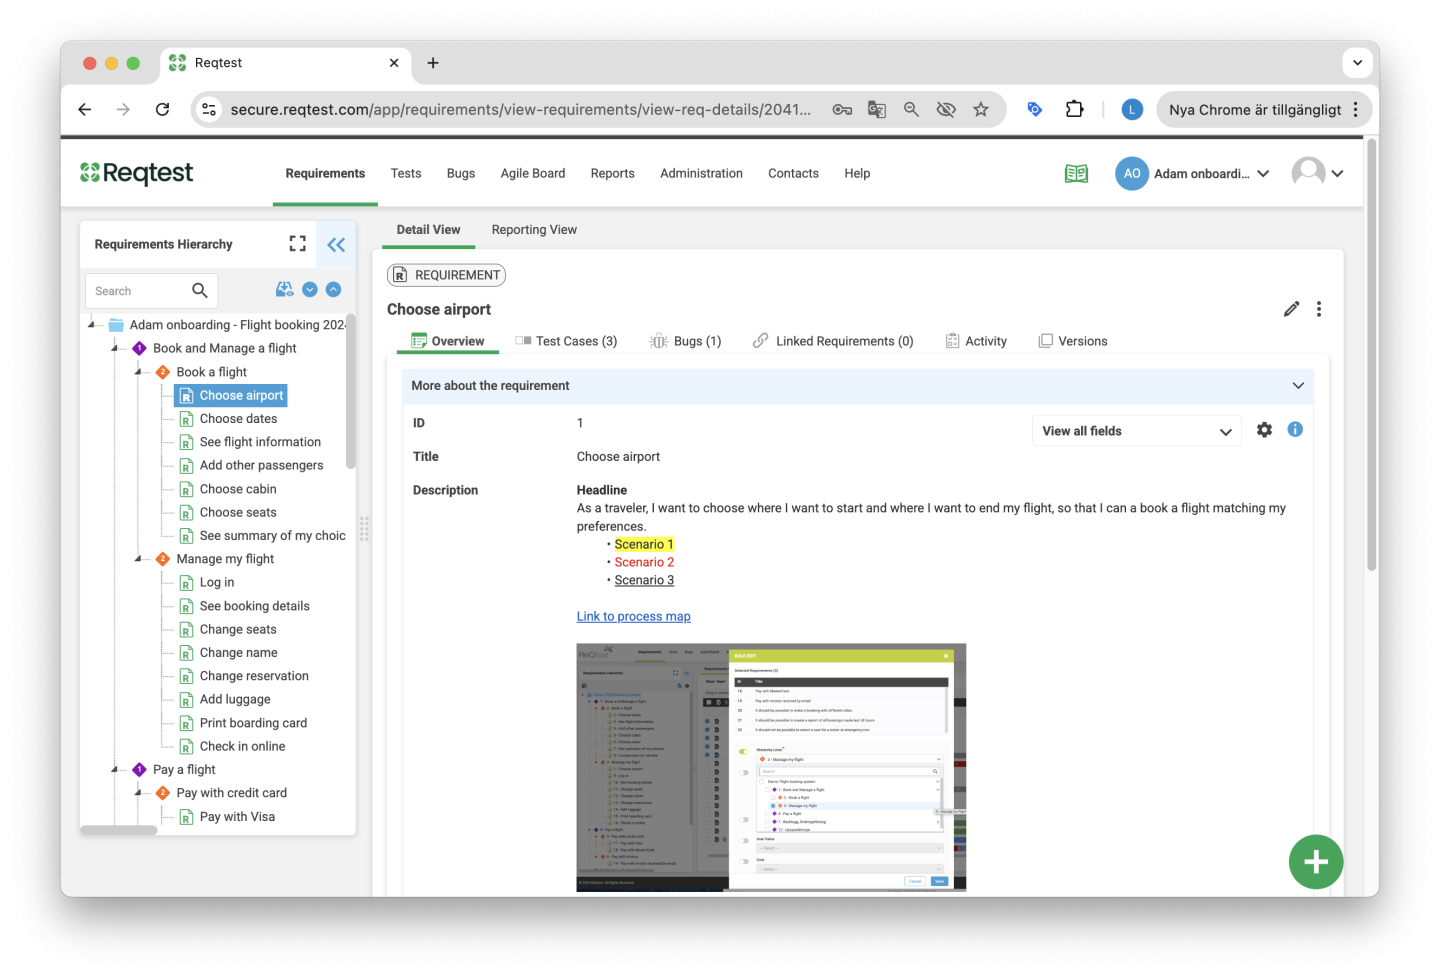
Key Features in the Detailed View
Select Which Fields to Display
Using the dropdown menu, you can choose which fields you want to see in the detailed view. Create your favorite views and share them with others.
Comments
Here you can write comments and easily tag project members so they receive a notification. Read more about comments here.
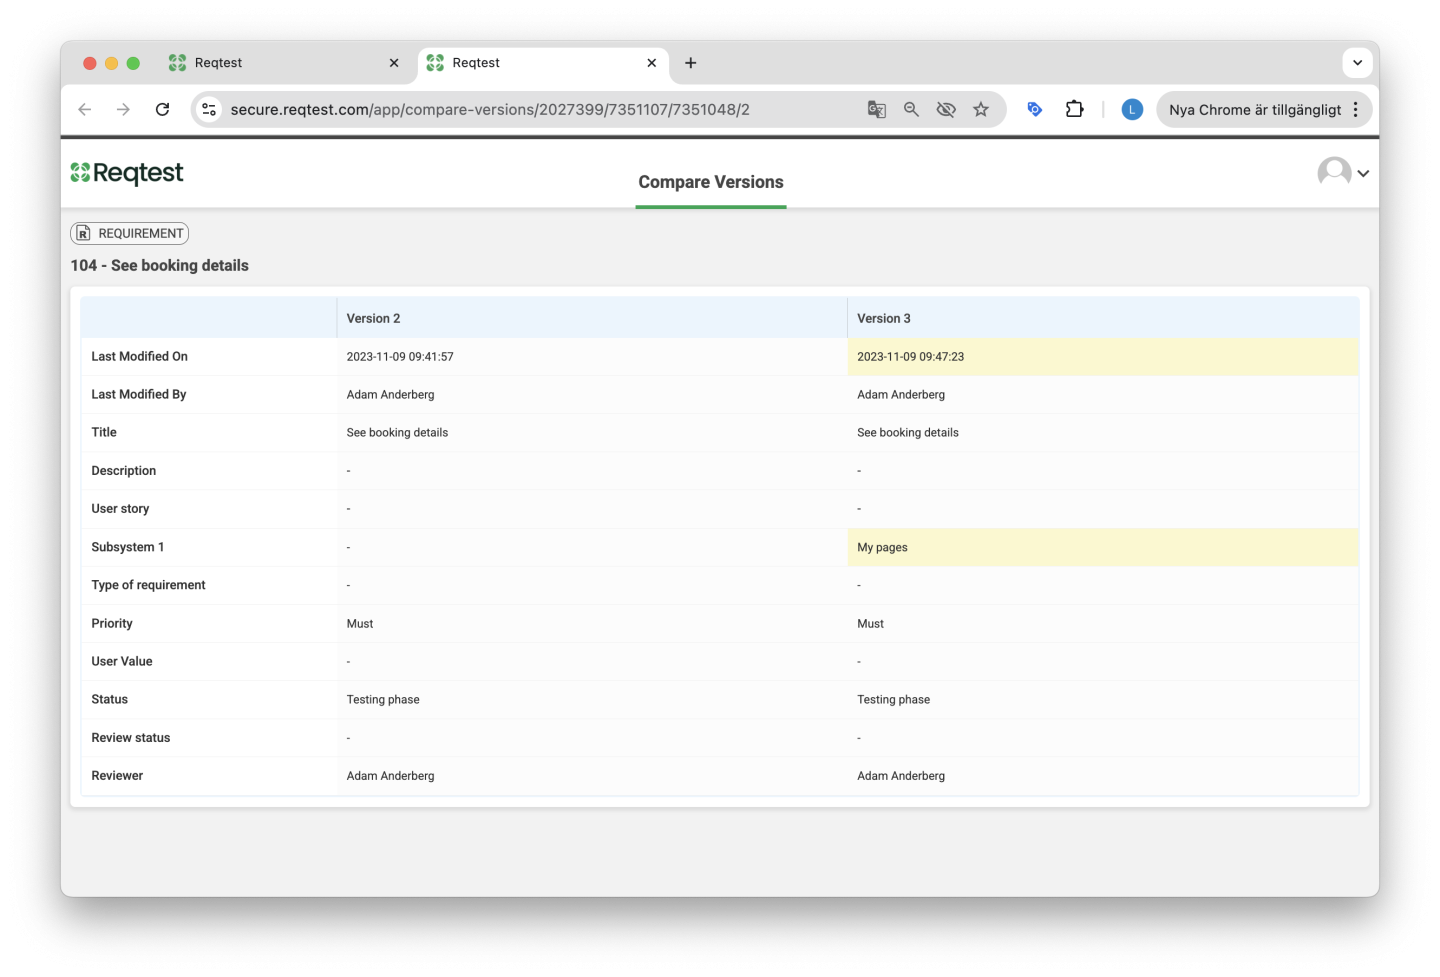
Versions
Here you can view all versions of the requirement and compare different versions to see how they differ.
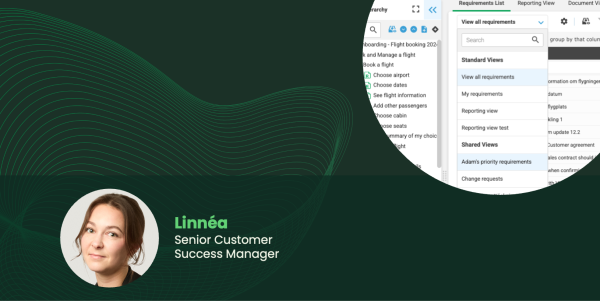
Test Cases
Here you can manage everything related to the test cases linked to the requirement. You can also view the test run results for the test cases.
Bug Reports
Here you can see bug reports that are linked to the requirement.
Linked Requirements
Here you can create links between requirements and view the connections between this requirement and other requirements.
Changes
Here you can see a change log of all changes made to the requirement.
Attachments
Here you can add attachments to the requirement. Read more about attachments here.
Report View
Under the report view, you get an overview of your test coverage. You can see how many test cases are linked to the requirement, how many have been executed, and how many bug reports are linked to the requirement.
Functions in the Kebab Menu
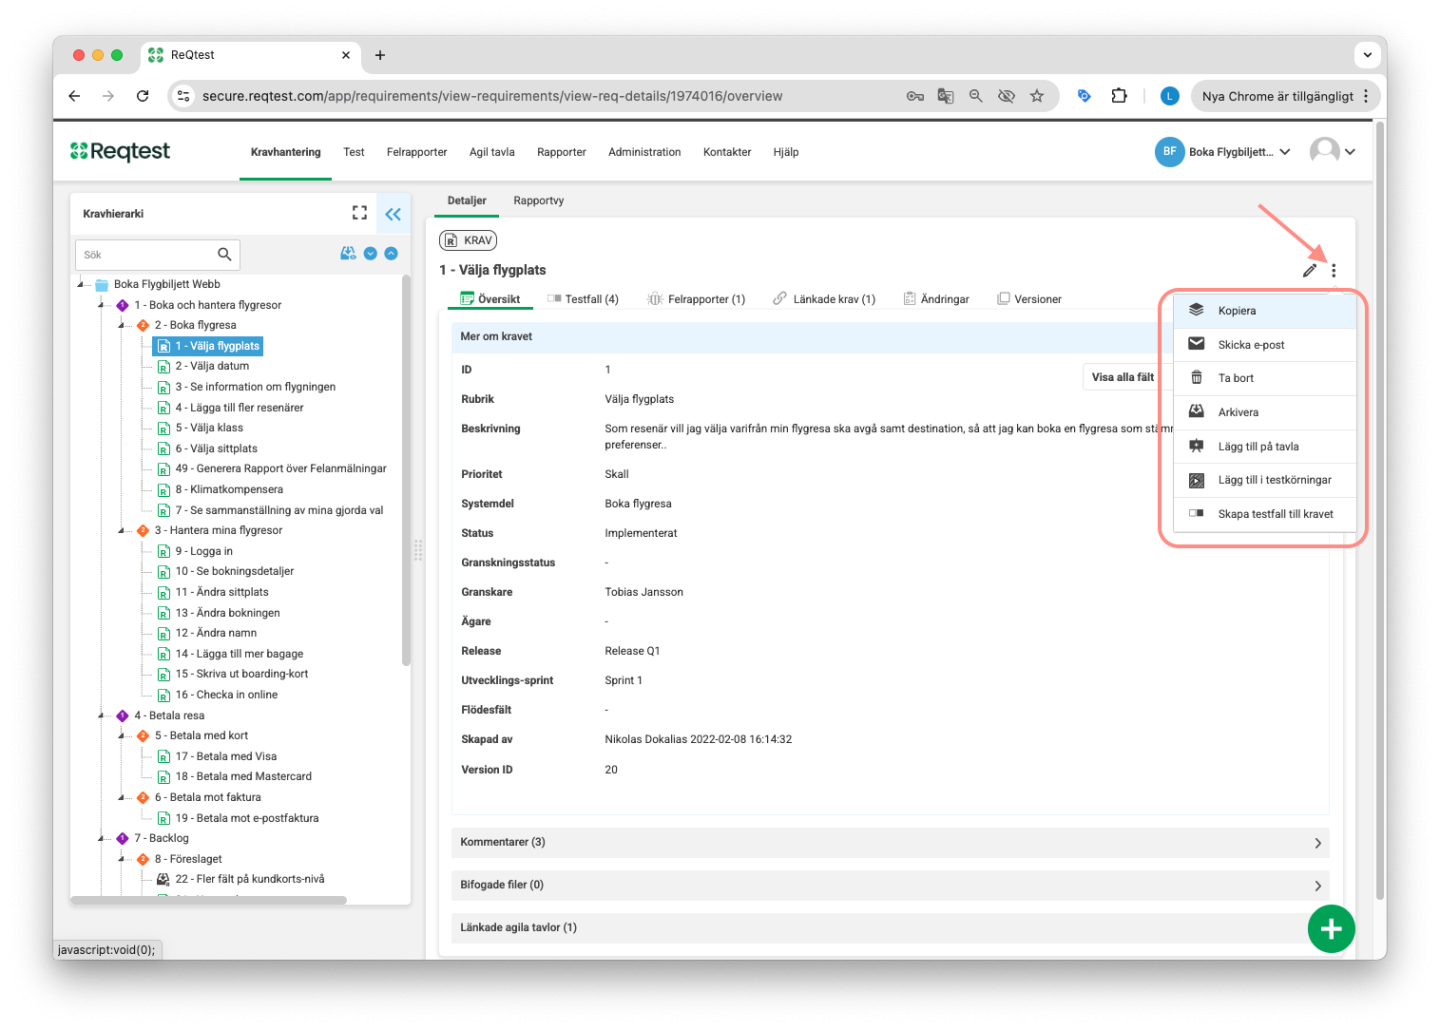
Copy – Create a customized copy of the requirement.
Send Email – Send an email to inform others about the requirement.
Archive – Archive the requirement.
Delete – Delete the requirement.
Add to Board – Add the requirement to the Agile Board, either as a sticky or as a lane.
Add to Test Runs – If you have linked your requirement to test cases for traceability, you can easily add them to a test run here. You can choose to add the test cases to a new test run or to an existing one. Read more about test runs here.
Create Test Case for Requirement – Create a test case that is automatically linked to your requirement.
Tips and Tricks for the Detailed View of Requirements
- If you want to easily scroll between requirements, use Previous and Next at the top right.
- Choose which information you want to see for the requirement by creating a custom view that only displays the fields you want. You can also share your views with other project members.
- We recommend that you always link your requirement to a test case. This ensures that you can track test coverage, test run results, and any reported bugs. In short, it creates traceability. You can view all this information directly from the requirement you are working with.
Frequently Asked Questions about Requirements
Videos on the Requirement Module